Living in a small rental studio can feel limiting, especially when one open room has to function as a bedroom, living area, workspace, and sometimes even a dining room. The lack of separation often makes the space feel cluttered and less comfortable. However, most lease agreements in the United States restrict permanent construction, meaning no drywall additions, no structural framing, and often no heavy wall anchoring.
That’s where compact polycarbonate room dividers become an intelligent, renter-safe solution.
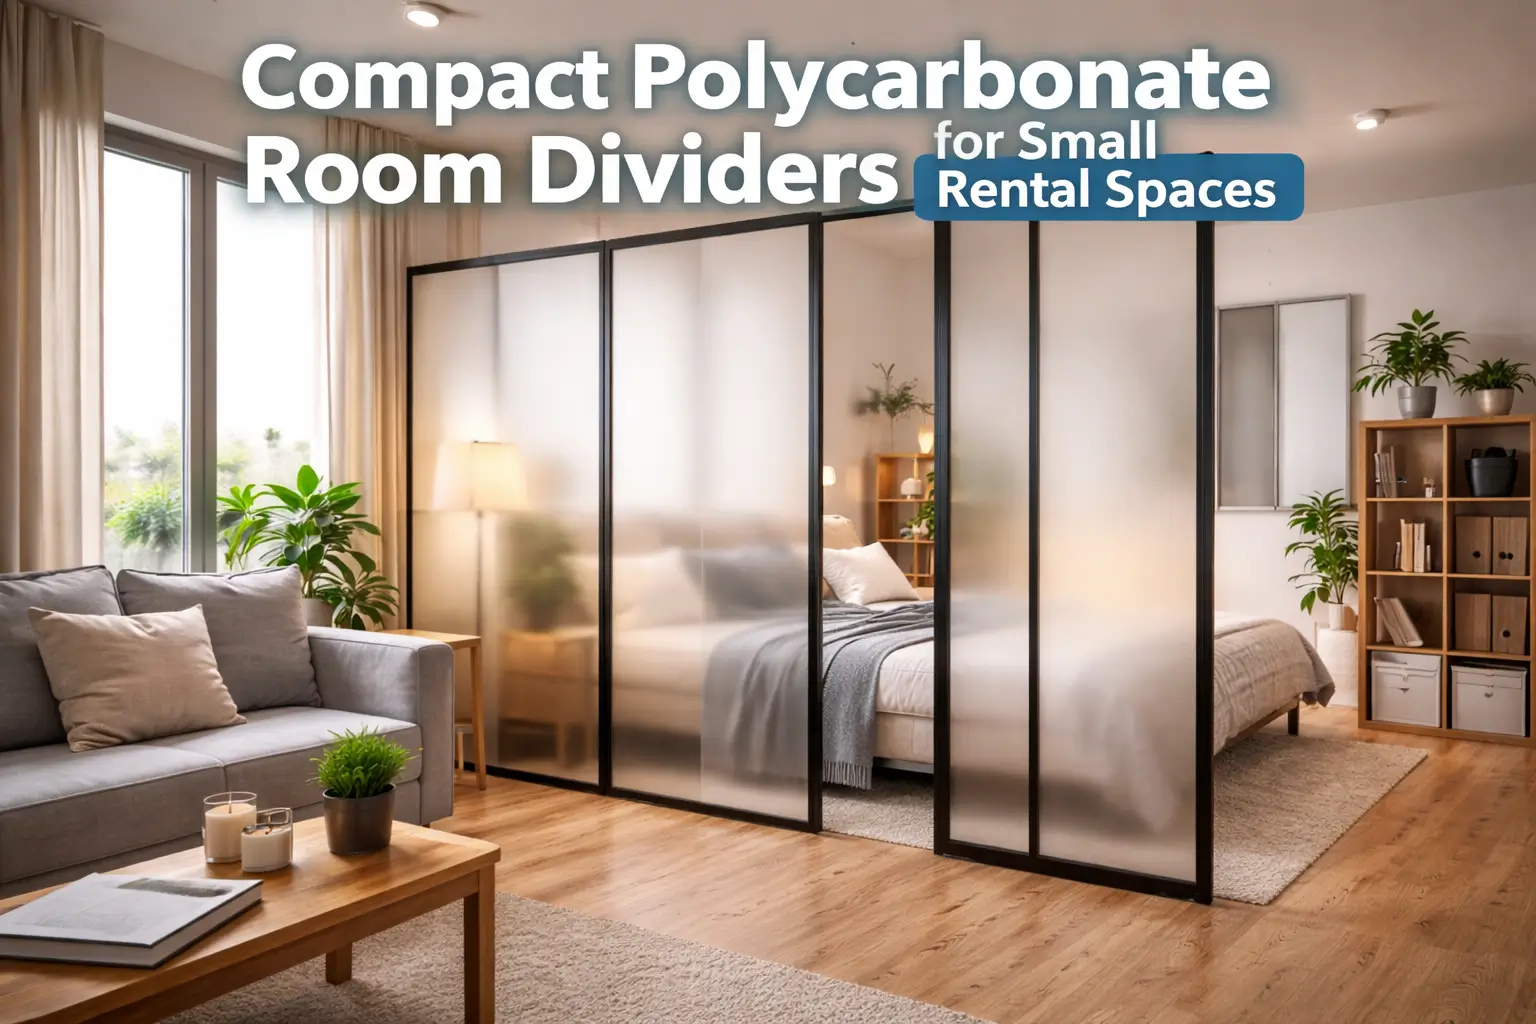
Unlike traditional walls, these dividers are lightweight, modern, and non-permanent. They allow you to define functional zones while preserving natural light — something critical in small spaces. In this detailed guide, you’ll learn how to plan, select, install, and maintain compact polycarbonate dividers effectively and safely.
Understanding Polycarbonate: Why This Material Works So Well
Before building or installing anything, it’s important to understand the material you’re working with.
Polycarbonate is a high-performance thermoplastic known for:
- Exceptional impact resistance
- Lightweight structure
- High light transmission
- Flexibility compared to glass
- Easy cutting and customization
Compared to glass, polycarbonate is approximately 250 times more impact-resistant and significantly lighter. Compared to acrylic, it is less likely to crack under stress. For renters, this combination means safer installation and easier mobility.
In small rental spaces, weight matters. Heavy materials increase the risk of instability and damage. Polycarbonate provides strength without bulk.
Why Small Rental Spaces Benefit from Compact Dividers
Small studios often suffer from:
- Visual clutter
- Lack of privacy
- Poor zoning between functions
- Disrupted workflow for remote workers
Adding a compact divider solves these issues by:
- Creating a dedicated sleeping zone
- Defining a work-from-home area
- Separating a dining corner
- Improving overall visual organization
The key is doing this without making the apartment feel smaller. Because polycarbonate allows light to pass through — especially in frosted or translucent finishes — it maintains openness while providing separation.
Types of Compact Polycarbonate Dividers for Renters
Choosing the right type depends on your layout and lease restrictions. Here are the most renter-friendly options:
1. Freestanding Dividers
Best for:
- Studio apartments
- Open-concept rentals
- No-drill leases
Advantages:
- No wall attachment
- Easy to move
- Fully removable
Disadvantages:
- Requires stable base
- May need weight distribution adjustments
2. Tension-Mounted Systems
These use adjustable vertical poles between floor and ceiling.
Best for:
- Standard ceiling heights
- Temporary room segmentation
Advantages:
- No drilling
- Secure vertical pressure system
Disadvantages:
- Not ideal for vaulted ceilings
- Must measure precisely
3. Folding Panel Screens
Lightweight framed panels connected by hinges.
Best for:
- Flexible layouts
- Temporary partitions
Advantages:
- Portable
- Easy storage
Disadvantages:
- Less stable
- Limited structural rigidity
Step-by-Step Guide: Installing a Freestanding Polycarbonate Divider
This is the safest and most universally renter-approved option.
Step 1: Measure Your Space Carefully
Use a measuring tape to record:
- Ceiling height
- Divider width
- Floor clearance
- Baseboard depth
Important tip:
Always subtract ½ inch from total height if installing a freestanding unit to allow easy positioning.
Step 2: Select the Right Polycarbonate Panel
Recommended specifications:
- Thickness: ¼ inch (6mm)
- Finish: Frosted or clear depending on privacy needs
- Weight rating: Confirm manufacturer specs
Avoid panels thinner than 3mm, as they may flex excessively.
Step 3: Choose a Lightweight Frame
Your frame can be:
- Aluminum (modern and lightweight)
- Pine wood (budget-friendly and customizable)
Frame design basics:
- Vertical supports on both sides
- Horizontal top and bottom braces
- Reinforcement bar if width exceeds 5 feet
Step 4: Assemble the Frame
On a flat surface:
- Connect frame corners using brackets
- Confirm square alignment using a level
- Tighten all screws evenly
- Insert panel into inner frame channel
Do not overtighten screws — polycarbonate expands slightly with temperature changes.
Step 5: Add a Stable Base
To prevent tipping:
- Attach perpendicular base supports (at least 12–18 inches long)
- Add rubber padding underneath
- Use low-profile weighted bars if needed
Stability is critical, especially if you have pets or children.
Step 6: Position and Test
Place divider in desired location.
Check:
- Vertical alignment
- Base contact with floor
- Wobble resistance
Push gently from both sides to ensure balance.
Design Considerations for Small Studios
Compact does not mean visually intrusive. Smart design improves spatial perception.
Recommended Design Choices:
- Frosted panels for bedroom separation
- Clear panels for office zones
- Slim black frames for modern look
- White frames for minimal aesthetic
Avoid:
- Thick wooden frames
- Dark opaque panels
- Full-height solid dividers in already dim rooms
Light preservation is essential in small rentals.
Budget Breakdown (United States Estimates)
Below is a realistic cost guide:
| Component | Estimated Cost |
|---|---|
| Polycarbonate Sheet | $80–$200 |
| Frame Materials | $60–$150 |
| Hardware & Brackets | $25–$50 |
| Stability Base | $20–$60 |
| Total Average | $185–$460 |
Costs vary depending on size and finish.
Maintenance and Cleaning Guide
Polycarbonate requires gentle care.
Do:
- Use microfiber cloth
- Clean with mild soap and water
- Dry with soft towel
Avoid:
- Ammonia-based cleaners
- Abrasive pads
- Window cleaners designed for glass
Scratches are possible, so treat surfaces carefully.
Safety Tips Every Renter Should Follow
- Never rely on drywall anchors in rentals without approval
- Avoid ceiling drilling unless explicitly permitted
- Always test structural stability before daily use
- Keep divider away from HVAC vents
If unsure about lease restrictions, review your rental agreement before installation.
When to Choose Polycarbonate Over Other Materials
Choose polycarbonate when you need:
- Better light flow than wood
- Safer alternative to glass
- Lower weight than MDF panels
- Modern aesthetic
Avoid it if:
- You require full soundproofing
- You want a completely opaque barrier
Polycarbonate offers privacy, but not acoustic isolation.
Common Mistakes to Avoid
Many renters rush installation. Avoid these frequent errors:
- Incorrect ceiling measurement
- Overloading tension rods
- Ignoring weight balance
- Blocking emergency pathways
- Using too-thin panel sheets
Precision prevents instability and frustration.
Advanced Layout Optimization Tips
For even better functionality:
- Place divider perpendicular to window to maximize light diffusion
- Align divider with furniture edges for symmetry
- Add LED strip lighting along frame edges
- Use neutral finishes to maintain openness
A well-placed divider enhances perceived square footage rather than reducing it.
Final Thoughts
Compact polycarbonate room dividers offer renters in small studio apartments a flexible, safe, and modern solution for space organization. They combine durability with lightweight convenience, allowing for zone creation without violating lease agreements. With careful planning, accurate measurement, and proper installation, you can transform your rental space into a more functional and comfortable environment — all without permanent construction.
Frequently Asked Questions
1. Will polycarbonate dividers damage rental walls?
Not if you use freestanding or tension-mounted systems.
2. Are polycarbonate panels better than acrylic?
Polycarbonate is generally more impact-resistant.
3. Can I install this alone?
Yes, lightweight panels are manageable for one person.
4. Do they block sound?
They provide limited sound reduction, not full soundproofing.
5. Are they easy to remove when moving out?
Yes, especially freestanding models.